Sunday, November 2, 2014

Creation Station: Gift Cards!


Happy Sunday everyone!  It's time for some great inspiration from the Creation Station Design Team.  This week we're focusing on the Seasonally Scattered Stamp Set, and all things regarding the giving of Gift Cards.

I'm focusing on Gift Cards today.  While I personally love a good gift card, they do seem a tad impersonal.  Therefore, I really like to dress up a package that I'll be gifting the card in.  It helps "jazz" up the gift.  

I always love to decorate these tins - I believe they are technically cd tins, without the cd holder inside....  I've got a stash of them that I've ordered from some webstore that I wish I could remember the name of.  :) 

I used All is Calm DSP.  I simply trace the tin onto the back of the paper I'm going to use and cut it out.  I adhere it with Multipurpose Liquid Glue.  For the front, I cut the paper in two to add some contrast, then I use a ribbon as a sort of belly band.  (the recipient just needs to slide the ribbon off to get to the goods)  For this one, I added some jingle bells and extra strands of Lost Lagoon ribbon.

The star was stamped and heat embossed in silver with a Bright & Beautiful stamp.

It's important to complete the inside of these tins.  I've kept this one rather simple:


I cut an envelope with our Gift Card Envelope die, and adhered it to the inside.  Added a button and a little Joy.... was enough for me!


I was going to create a gift card holder using our Gift Card Enclosure envies, but it just took on a mind of it's own, and this is what I did instead! 

Can you say PERFECT for teacher gifts or neighbor gifts.....loving this idea!  I'll be making a ton of these bad boys!

My last project today is something that my Stamp Club gals made.  A fun Gift Card holder - shaker card.  This uses our Gift Card Die too.  


I stamped the images from White Christmas, coloring in the cardinal and snowman - it helped add a pop of color.  I used an aqua painter filled with rubbing alcohol and a Soft Sky ink pad to create a sky.  The rubbing alcohol helps that ink dry faster and then your paper doesn't warp so bad.

I hope that I've helped get your creative juices flowing.  And just so you'll be further inspired, you'll want to continue on our hop using the buttons below!  

Enjoy your Sunday!


post signature

Tuesday, October 7, 2014

Snowflake Card Thinlit - Stampin' Up!

Howdy Folks!

I've got a quick card for you today - and this one just uses the Snowflake Card thinlit die and the Wonderous Wreath Stamp set.


You can cut a snowflake by simply turning your die and cutting the paper again - as I did for the Pear Pizzazz DSP on the front, and also the inside sentiment on the inside.


Learn to create your own embossing paste, make your own stencils, and lots more!


New Online Class - Envelope Punch Board Class
Create 5 boxes! Not envelopes!  Using the EPB!


post signature

Monday, October 6, 2014

Ornamental Pine - Stampin' Up!


I am going to admit it.  As far as stamp sets are concerned - I'm a sucker for pine boughs and cones.  I think I am enthralled with how life like they can be.  

Today's card was quite simple to create.  I stamped the branch in Old Olive onto a panel of Crumb Cake.  Then stamped the cone in Early Espresso.  

To make things pop a little, I added some highlights with my white gel pen, and then added a some Dazzling Diamonds glitter with a two way glue pen.

I know it's hard to show you the full effect of this in pictures.  

I think the "sweater pattern" from the Trim the Tree DSP stack works well with this card. 

What do you think?  Did I help this branch come to life?

Supply List tams# 1413

Product List


Learn to create your own embossing paste, make your own stencils, and lots more!


New Online Class - Envelope Punch Board Class
Create 5 boxes! Not envelopes!  Using the EPB!


post signature

Sunday, October 5, 2014

Creation Station: Halloween Fun!


Hey there! It's time for another project tour from the Creation Station Designers!

Let's talk Halloween this week - shall we?  We're going to focus on the Fall Fest Stamp set, and the Tiny Treat boxes from Stampin' Up!


I don't go crazy for Halloween, but it is a fun holiday, and my kids love it!  For the candy, I'm sure.  So let's take a look at a few things I came up with. (don't mind the bad photography today....not sure why I've got a "halo" effect around the bottom of my photos.....)

First up is this really cute card.  

I started with a black panel and added some stars using embossing paste and our stars decorative mask.  

The pumpkins from Fall Fest were perfect on here.  I layered them with Stampin' Dimensionals, doubling the dimensionals to be two thick for the squatty pumpkin in front.  This really helped to add depth.

I finished it off with some Blackberry Bliss ribbon and a silver basic button.

Next up, I created a treat holder using our Hamburger box die.  This went together quickly.  


I stamped the ghost onto black cardstock with Whisper White ink and heat embossed it with white powder.  Added a little pumpkin friend, and tied the box up with some burlap ribbon, Blackberry Bliss ribbon and a bit of Old Olive two tone trim.


Lastly, I created a simple, but cute treat container.  (this would be perfect to gift to a neighbor, a teacher, or keep on your kitchen counter.....or on your stamp desk!)


I wrapped some DSP from Monster Medley around the jar. ( You can grab these jars from your box stores on the cheap!)  The 12" strip of DSP did not go all the way around the jar, so I had to piece it together.  To cover up the seams, I die cut a piece of black cardstock with a Windows framelit, and trimmed off 3 sides, so I just had the top curve.  This kind of mimicked the shape in the jar.  It also gave me a non-busy base to add my ghost and pumpkin.

To complete the jar, I added some Blackberry Bliss ribbon and a tag - die cut from the Hamburger Box die, and stamped with Enjoy from Num-Num.

I hope you are inspired to create something fun for the upcoming Halloween Festivities!  

Be sure to travel along our blog hop for inspiration - use the buttons below to see what our team has dreamed up for you!


Learn to create your own embossing paste, make your own stencils, and lots more!


New Online Class - Envelope Punch Board Class
Create 5 boxes! Not envelopes!  Using the EPB!


post signature

Sunday, September 21, 2014

Creation Station: Harvest Party!!!


Hello!  Are you ready for a Harvest Party?  This week, our talented group of Stampin' Up! Demos are featuring all things related to Harvest Parties.....we'll also spotlight the For All Things stamp set and our new Petite Cafe Gift Bags.

So, let's get the party started!

First - you need an invitation:


I did something a little different for this, and created a belly band for my invite.  The belly band was stamped with You're Invited and then adorned with some scraps of Typeset Designer Series Paper, a scrap of burlap ribbon (just the edge that I had cut off for another project), some feathers and a gold button.

I stamped the background of the Crumb Cake card base with the leaves and acorns from For All Things. 

Now, when you get to my party, you'll enjoy a buffet.  I'll label the things we've got with cute little cards like this:


When you take your seat, you'll have a napkin that's got a napkin holder sticking with our theme.

I just wrapped some of our burlap ribbon around my napkin, tied it off with some Old Olive Thick Bakers Twine and added a tag that was stamped with images from For All Things.  You could easily change your tags out - maybe to include your guests' name.

 At my party, the guests are going home with a treat....presented in our Petite Cafe Gift Bags.  
I stamped the sentiment from Num-Num and kept this pretty simple.

Added some burlap, feathers and leaves, called it good!  


I hope I've left you with some inspiration today.  Now it's time to travel onto the very talented Ilina Crouse's blog  - just click the Next button below.  Or click the Back button to see what Justin Krieger has dreamt up for us!  Either way, it's inspiration galore!


New Online Class - Envelope Punch Board Class
Create 5 boxes! Not envelopes!  Using the EPB!


post signature


Wednesday, September 17, 2014

Wonderous Wreath - a wreath for all seasons!


A lot of times when I'm purchasing new decor for my house, I often think that I'd like something more if I could just switch one thing out for the next season.   You know, something that's multi-purposed!  That way I wouldn't have to find a place to store it. I could look at my new treasure longer....etc, etc.

This is exactly why I love this Wonderous Wreath stamp set from Stampin' Up!  It's multi-faceted!  Just change out your colors and it can be for any season.  Add some flowers for spring, stamp it in patriotic colors for Independence Day....this wreath is awesome!

Another great thing - swap out your sentiment - it can be for birthday, anniversary.  Heck, stamp it in baby blues for a new baby (or pinks!).  

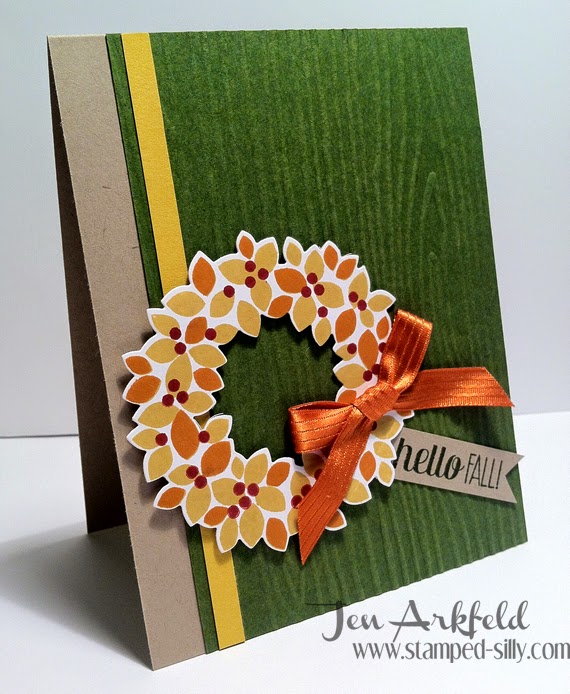
Today I went the fall route.  I used a Crumb Cake base, and topped it with a Mossy Meadow panel that had been embossed in woodgrain.  Then added just a small strip of Hello Honey.  The wreath itself was stamped first with Hello Honey, then with Tangelo Twist, and lastly the berries are Cherry Cobbler.  I added a little bow to finish it off, and my sentiment.  

What do you think?  What colors would you use for something different?  I'd love to hear!  Leave me a comment....just look for the comment link under this post.


New Online Class - Envelope Punch Board Class
Create 5 boxes - some with lids! Not envelopes!  Using the EPB!


post signature

Sunday, September 7, 2014

Creation Station - Alphabets


Good morning friends!  Time for another Creation Station blog hop.  This time we are focusing on alphabets and tags.  I'm gonna stick with all things Alpha and the great things you can do with them.


Here's an idea that's easily adapted to anything you want it to say.   Just use the letters, scramble them up and stamp away!  This also makes a great mailable card.

Next up, a little Christmas card....I simply used the negative image of the Little Letters dies and married it with the Holidays sentiment.  Can you say easy peasy?

Lastly, I again used the negative images paired with the Hexagon punch for a fun birthday card.

All of these cards are very clean and simple and good mailable cards too.  Hope you like them.

Now...travel along your way to the other blogs for more inspiration.


Learn to create your own embossing paste, make your own stencils, and lots more!


New Online Class - Envelope Punch Board Class
Create 5 boxes! Not envelopes!  Using the EPB!


post signature