Thursday, June 6, 2013

Another Craft Project Central Project! Still time for the GIVEAWAY!

Make this beautiful wall hanging for your crafty friends or family, or just to decorate your own craft room or office.  If making for a gift, be sure to make the matching card for an impressive gift ensemble!  This project makes for a fun class, club or camp project as well!!


This pretty project comes to you designed by Monika!

To get the instructions for Monika’s project, just subscribe to June!  And if you have a minute, please leave Monika a comment on her project!  Have a great crafting day!

Remember, I announced that I'm a Guest Designer over at Craft Project Central this month? How would you like the chance at a free subscription to this month's Craft Project Central's projects?  They have given me one subscription to giveaway!  To be eligible - leave me a comment on this post.  I will pick a winner on Saturday June 8th.  Want multiple chances to win?  Come back every day this week (June 1-7th) and leave a comment on each daily post! You'll have 7 chances to win!

post signature

Wednesday, June 5, 2013

Magnetic Platform!!! Sweetness!

Have you had enough time to flip through the new 2013-2014 Stampin' Up! Catalog?

Does your catalog look like mine - with flags sticking out of nearly every page?

What's on your wish list - one on the top of mine is the new Magnetic Platform for the Big Shot.  Here's why:


post signature

Tuesday, June 4, 2013

Craft Project Central....Gingham Garden

Hey there!  I want to share with you the next project for this month's line up from Craft Project Central - and it's adorable!  I'm a little bit partial to the Gingham Garden Suite, and this project does not disappoint!  

Gingham Garden Sugar Scrub Gift Set!

This luxurious Sugar Scrub in a jar is a super easy "two-ingredient recipe" that you can make as a quick summer gift for a friend or neighbor!  After making the scrub and decorating the jar, it’s a perfect fit in the slip-wrapped Kraft Gift Box – simple and so sweet!  (I love the white flower on the belly band! So pretty!!) Then make the coordinating card to go with it all to complete your pretty gift ensemble!


This pretty gift set comes to you designed by Julie!

To get the instructions for Julie’s project, just subscribe to June!  And if you have a minute, please leave Julie a comment on her project!  Have a great crafting day!


Remember, I announced that I'm a Guest Designer over at Craft Project Central this month? How would you like the chance at a free subscription to this month's Craft Project Central's projects?  They have given me one subscription to giveaway!  To be eligible - leave me a comment on this post.  I will pick a winner on Saturday June 8th.  Want multiple chances to win?  Come back every day this week (June 1-7th) and leave a comment on each daily post! You'll have 7 chances to win!


post signature

Monday, June 3, 2013

Just for You! Quick & Easy with Label Love


Do you ever need a super quick and easy card?  Don't we all???  Today's card is just that.  And it doesn't look too shabby either!
This one comes together in less than 5 minutes.  Start to finish!

Start with your Crumb Cake card base and add a layer of Epic Day DSP.  Mine measures 4 x 5-1/4".  Add a couple of strips of Washi Tape from the Epic Day This & That collection.  Die cut an element from the Apothecary Accents Dies, pop that up over the top of the washi tape.  Stamp your sentiment from Label Love (it's new!), and punch it out with the coordinating punch.  (don't you just love when there is a punch that coordinates?)  Pop that up over the top of the die cut.  Add a few Basic Pearls at random locations - and you are done!

Don't you love when they come together that quick?  


Remember, I announced that I'm a Guest Designer over at Craft Project Central this month? How would you like the chance at a free subscription to this month's Craft Project Central's projects?  They have given me one subscription to giveaway!  To be eligible - leave me a comment on this post.  I will pick a winner on Saturday June 8th.  Want multiple chances to win?  Come back every day this week (June 1-7th) and leave a comment on each daily post! You'll have 7 chances to win!


post signature

Sunday, June 2, 2013

Colors of the Sea....Bermuda Bay, Coastal Cabana


Howdy folks!  Today's card is a mixture of old and new!  I've got some oldish? stamp sets - but not terribly old - Delightful Dozen and Secret Garden.  I've got some new colors - Bermuda Bay (although, technically it's a comeback!) and Coastal Cabana - mixed in with some not so new colors - Crumb Cake, Early Espresso and Primrose Petals.  I really love that about Stampin' Up's color collections.  You can easily mix and match them - they will typically "go" together.  They've made it almost impossible to come up with an icky color combo.  


I also threw in our new Modern Mosaic embossing folder.  Be prepared to see a lot of this on my blog - I just love it!  It adds a classic element and it's so hot right now!

For the flower - I simply embossed it with Black embossing powder and used a Blender Pen and the Coastal Cabana ink pad to color it.  I went back with a Bermuda Bay Marker to color in the stamens (is that what they are called? - I'm having flashbacks to my 7th grade science class.  And unfortunately - that was a very long time ago.  We won't go into that tho!)

I like how the ribbon adds a splash of color - but am wishing some of my new ribbon was here already - I'm dying to play with the new Chevron ribbon.  


Remember yesterday I announced that I'm a Guest Designer over at Craft Project Central this month? 
How would you like the chance at a free subscription to this month's Craft Project Central's projects?  They have given me one subscription to giveaway!  To be eligible - leave me a comment on this post.  I will pick a winner on Saturday June 8th.  Want multiple chances to win?  Come back every day this week (June 1-7th) and leave a comment on each daily post! You'll have 7 chances to win!

post signature

Saturday, June 1, 2013

Ahhhh....New Catalog....New FUN! Really Good Greetings & a GIVEAWAY!


Are you missing the old Stampin' Up! catalog already?  

Nahhh....


Not me!  I happen to really like change and lots of new things!  So, I'm all about having a new catalog to drool over!  


One of my new favorite sets is Really Good Greetings. 


Why?


Because they are Really Good!  :)  


I like the mix of fonts and styles in the set.  (I've been known to go goo-goo over typography!)  Like the "I miss you already" - great mix of fonts.  Love that.


This card happens to use all of the 2013-2014 In Colors.  Yes.  It really does - I had to sneak in the Strawberry Slush....but I did it!  

My card base is Baked Brown Sugar, topped with the newsprint from Soho Subway.  I used Coastal Cabana for the tag portion, and stamped it with Bermuda Bay - just so it would stand out a bit more.  The flowers are Crisp Cantaloupe and leaves are Pistachio Pudding.  So....where did I sneak in the Strawberry Slush?  The large flower center was stamped with it, then I grabbed a Sharpie Marker in a very similar color and colored some of our Basic Pearls to pull the color in a bit more!  I like it!

Are you ready for some more fun stuff?

Do you remember yesterday I announced that I was going to be a Guest Designer this month over at Craft Project Central?  Well....it's officially June, (yikes!  June already!!!) and I can start showing you this month's projects!  The design team has some great things to show off - and with your monthly subscription, you get all of the project instructions - about 10 awesome projects!  These aren't your ordinary projects.  Lots of 3D items and over the top paper crafted goodness!  Let's take a look at the first project in this month's line up!


Welcome to Craft Project Central for June!!

Here is a sneak peak at the projects that have been loaded so far this month.  You will have access to all of these great projects when you subscribe to June!  Remember that new projects will be posted every two to three days until the end of the month, so make sure to check back often or subscribe to our email updates!


My Dad Printer’s Tray & Card!
Many children believe their Dads are invincible, heroes of amazing strength and wisdom.  This project is designed to showcase Dad through a child’s eyes.  It was designed using a Printer’s Tray with six equal 4" x 6" openings but any divided frame will work.  Another alternative would be to bind the various panels into a mini album instead of displaying them in a frame.  The coordinating card will work for Father’s Day or a birthday by just swapping out the inside sentiment.

Click here to subscribe to June!

This great Father’s Day project comes to you designed by Leena!

To get the instructions for Leena’s project, just subscribe to June!  And if you have a minute, please leave Leena a comment on her project!  Have a great crafting month!

SO!!!  How would you like the chance at a free subscription to this month's Craft Project Central's projects?  They have given me one subscription to giveaway!  To be eligible - leave me a comment on this post.  I will pick a winner on Saturday June 8th.  Want multiple chances to win?  Come back every day this week (June 1-7th) and leave a comment on each daily post! You'll have 7 chances to win!

post signature

Friday, May 31, 2013

It's HERE! And it's LIVE!!!


The new Stampin' Up! Annual Catalog is here!  And you can begin ordering from it now!

Want to see it?

CLICK HERE FOR A FLASH VERSION

CLICK HERE FOR A DOWNLOADABLE PDF COPY

Ready to order some of this fun stuff - feel free - just CLICK HERE TO SHOP NOW!


The Hispanic Catalog is also available starting today!

VIEW FLASH VERSION HERE
VIEW PDF COPY HERE


To celebrate this catalog kickoff - we've also got a NEW Photopolymer Stamp Set available:


 I just love this new stamp set option!  Perfect for summer vacations - great for scrapbooking!  Just love it!

Guess what - I have another big deal!  Check this out....


These stamp sets are now on sale!!!
Dates: May 31-June 30, 2013
Sale PriceRetail PriceDescriptionItem
$17.96
$23.95
Sassy Salutations Wood-Mount Stamp Set
132070
$13.46$17.95Sassy Salutations Clear-Mount Stamp Set126707
$14.96
$19.95
Sweet Essentials Wood-Mount Stamp Set
132085
$11.21$14.95Sweet Essentials Clear-Mount Stamp Set126457
$21.71
$28.95
Petite Pairs Wood-Mount Stamp Set
128706
$15.71$20.95Petite Pairs Clear-Mount Stamp Set122497


And....I know I have been quiet here for a little bit.  I assure you that it's not on purpose!  I seriously have not had time in the past two weeks (at least!) to stamp anything!  That makes this momma just a little bit irritated!  There just has not been a spare moment to do anything in my craft room at all.  
The kids have been out of school for a week and a half.  They seem to be sending me into overdrive.  I thought this summer would be smooth sailing since they are older, and because they have a chore list for the first time! My thinking with that was that I'd have more free time to do business things.  Well....the first week of chores was rough....I was really beginning to think that it would be easier if I just continued to do everything myself.  However, after a week under our belt, the chores are getting easier.  Will is now making his bed before he even comes downstairs.  Aubrie does not want anyone to help her at all (she's three).  Alex...well...he's Alex, and he'll complain about chores forever.  Unless it's to sweep out the garage.  Really. He WANTS to sweep out the garage.  I think we'll get there.  At least by August!
We also threw a garage sale into the mix recently.  It was good.  I purged all of our baby gear - which made for more room in our basement.  Well.  It kind of made more room.  I've still got some things to get rid of.  In time.  Mostly kids clothes.  Which I did sell a lot of, but will donate the majority of what's left. 
Anyway - 
I finally made a card yesterday - A CARD!  It felt so good to put some ink to paper again. (don't worry - I WILL share it tomorrow!)

Have you stuck with my thru all of this???  Cuz I have some more news!  I am a Guest Designer this month (June) over at Craft Project Central!!!!  I have a really great project that will be included in your subscription this month and I can't wait to share it with you - but you will have to wait a little bit!  Just a little bit - don't worry!!!

Alright - so here's to June being a better, slower month for me!!!  And here's to June being a very inspirational month for you!  I really believe that as my family settles into the new routine of summer....all will be good! And creative. And inspirational.  Cheers!
post signature

Tuesday, May 21, 2013

Seriously....Seriously!


Howdy folks - I have a fun little card to share with you today.  This is one of the cards that we made at this month's Stamp Clubs - and it's about the shine!  I tried something a little different for the top portion of the card - and think I may have overdone it slightly....I used my Versamark pad around the edges of the cardstock - much like if you were distressing the edges with an ink pad.  Then I sprinkled on the Silver Embossing Powder and heated away.  I just think I should have used a bit less ink/powder.  It's a little much.   I did use the Silver EP to stamp the 'seriously' stamp too.  The arrows and hearts come from the Show & Tell Photopolymer stamps.
Oh - and I'm sure you are wondering where the 'seriously' comes from.  It was in last month's My Paper Pumpkin kit.  I am loving these kits - and I'm always so pleased when my kit shows up in the mail.  You can join the Paper Pumpkin craze by subscribing HERE.  Want to simply try the program?  You can do that too!  Simply click here for more information!  What do I love about Paper Pumpkin?  Well - for starters - everything is cut for you and ready to go, instructions included.  Secondly, all you need is some adhesive to glue things together. (and guess what?  I'll send you a complimentary tape runner just for signing up!)  Also - the kits are small enough - they don't take up any room.  Likely you will make your project up (it takes about a half hour to complete the projects) and display it, or send the cards off, or gift your project.  Each kit is different - they won't always be cards!  What's stopping you from having a little creative bliss delivered to your door each month?

Are you now wondering where those shiny chevrons are from.  Guess what - it's one household item that about everyone has....Aluminum foil!  Simply glue it to a scrap piece of cardstock, and run thru your Big Shot Embossing folder!  

Be sure to stop back tomorrow and I'll show you how you can color the foil!!!  


post signature

Tuesday, May 14, 2013

More Blue Ribbon Graduation! And a challenge for you!


Howdy folks!  I've got another graduation card to share with you today!  This one is clean and simple, and bold and graphic.  Sure to please a teen graduate - right??


This one has a card base of Smokey Slate - have I mentioned that I really like this shade of gray?  (no pun intended there peeps!)

To make this card, I simply used our largest square punch, 1 3/8" and marked the center - which is 3/4" - I think...Heck....I'm no mathematician!  I was just saying the other day that I don't know why Algebra is a required course.  After all....when was the last time I used Algebra - 1992???  

Anyway....mark the center of your square so that you can punch the center out with a circle.  I use the mark as a guide to make sure that I'm not going to end up with my punched circle off to one side or the other.  It's not going to be perfect, but it'll be darn close.  

THEN - I laid out my four circle-squares and decided how much space I needed between them, which determined how big my white square would be.  In other words - I kind of worked backwards.

The numbers were a die I used from my stash, but I did use our Adhesive Sheets on the back of the cardstock before I die cut them - and that was a LIFESAVER!  No Two Way Glue, No Tombow - just peel and stick!  SWEET!   

And once again - I splattered the card all up - for that teen appeal!  Well. And because I like it!

I hope you'll use this as inspiration for some graduation cards yourself - but what else could it be?  An Anniversary card?  Soften the colors, and it could be a Baby card with the year the baby was born.  Shall we try a little challenge?

Use this card as inspiration for your own - and link up your creation back here.  You can use the color combo, the sketch, whatever inspires YOU!  You don't need to stick with just Stampin' Up! products. Post your creation on your blog, an online gallery, Flickr - just be sure to link it back here!  I'll leave this challenge open for one week, and next Tuesday I'll pick a winner that will receive a prize package of lots and lots of goodies - embellishments, cardstock, designer paper...  So - go have some fun, would ya!


post signature

Monday, May 13, 2013

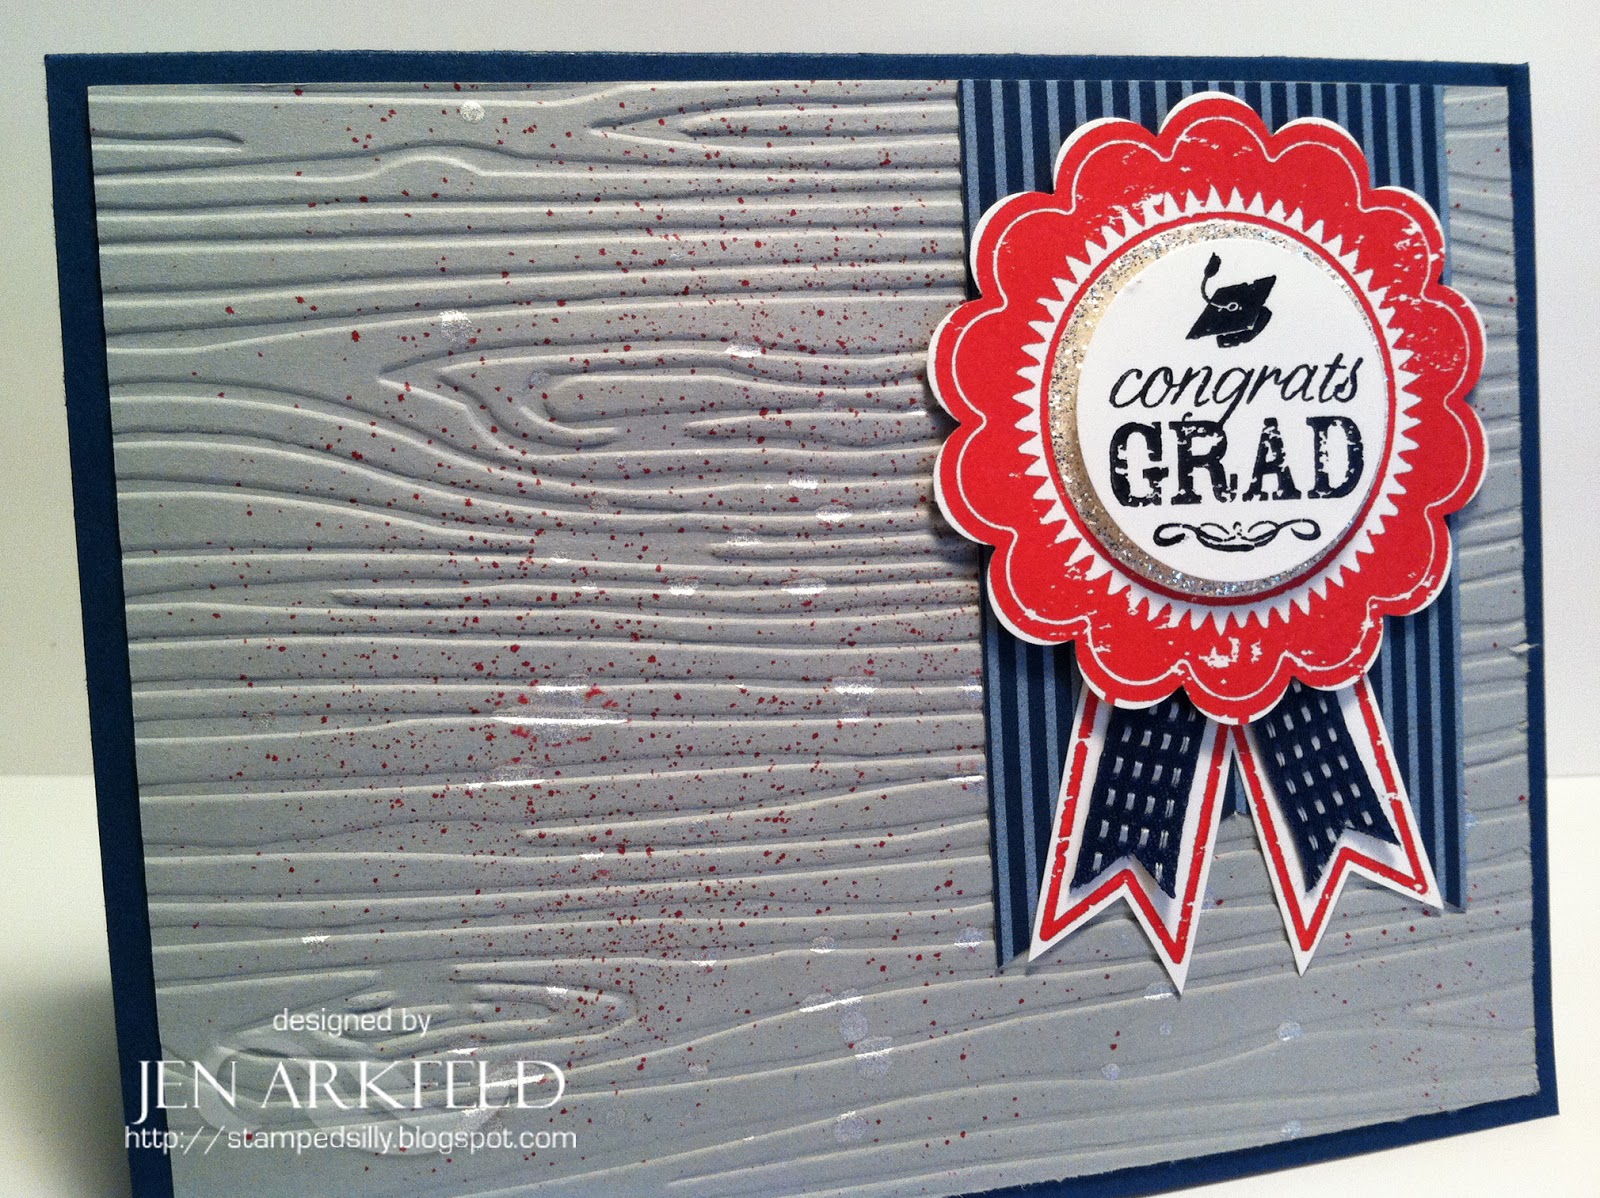
Congrats Grads! --- Blue Ribbon


It was a weekend filled with Graduation Parties!  Which also meant that I needed to create some cards.  One of my girlfriends also needed several cards - so I went to town.


This one was super easy to duplicate, and I liked it because I could change the colors to coordinate with the school colors of the graduate!  I even got to try out our new Smoky Slate cardstock - and I really like the color.  It's not too dark, it's not too light, and it gives a bit of a silver tone to your crafts.  The cards we needed were all for boys, so to grunge the card up a bit, I used the Color Spritzer Tool to spritz on some red color.  Then I used a mix of Platinum Shimmer paint and rubbing alcohol mixed in one of our spray bottles, but instead of spraying, I unscrewed the tube and flicked the hose portion, creating some splatters instead.  You can really see them here:


Like I said before, this card was easy to switch out the colors to coordinate with the school colors:


I also used a different embossing folder - I think I like the chevron one better, but this lent a masculine touch also.


Hope you like!  Let me know by leaving me a comment!

post signature

Sunday, May 12, 2013

Happy Mother's Day! A Noteable Gingham Garden Gift


Hi there everyone!  I hope you are having a wonderful Mother's Day today!

I've got a fun little gift to share with you.  We created these notepads at my most recent Crafts and Cocktails event.  I made a couple - one for my mom, one for my mother in law, one to give away (keep reading!) and one for ME!   They are so cute and pretty easy to whip up - especially the way all of the papers in the Gingham Garden DSP Pack coordinate with each other.  And I've got a little bit of a crush on these papers!

 I layered up several patterns of paper and topped them off with some washi tape, a doily, and some die cut letters.


I added some washi tape to the top corner, and topped it off with our new Vintage buttons!  These are really  cute, and I love that they have a flat back, making it easy to glue onto projects.

I created a pocket on the front of the notepad, with a pull-out tag.  I can write a message on the tag if I want to!  And of course, I embellished it a bit.  The washi tape is so easy to work with, if you don't like where you've put it, it lift back up easily so you can move it around til you're content.


I also duded up a pad of sticky notes.  Aren't these just stinkin' adorable???  It just seems so flirty and fun.

Now - I wanted to gift this - so needed some cute packaging!  No prob....I whipped up a matching gift bag:


And to hold the bag closed - I created a magnetic clip!  Multi purpose there!

Let's hear it - would you love this little gift?  How about a give away!  Leave me a comment, and one lucky person will get this package mailed to them!  You have until Thursday, May 16th to comment, and this will ship out on Friday!

post signature

Wednesday, May 8, 2013

I love Sneak Peeks!


I'm just gonna throw this out there right away - Gingham Garden Designer Series Paper ROCKS!  Be prepared to see a lot of upcoming projects from me that use this paper.  There are so many great designs in this pack!

At first I was a little leary of using this bold blue design - but loved it when I paired it with the Strawberry Slush Cardstock!  Throw in some Gingham print, and I think I really like the blue print....


Only wishing I'd done some stitching along the bottom of the gingham where it meets the Daffodil Delight Scallop.....maybe I could add a few random buttons......I mean, c'mon - I've finally used some DSP, but no buttons and no ribbon.....Something must be seriously wrong with me!  Do ya s'pose I could use all three on a project for tomorrow?

post signature

Tuesday, May 7, 2013

Celebrate Today - Perfectly Penned


I've got a little sneak peek for you today!  Just a teeny one tho!

This past Sunday we had the opportunity to help a great couple celebrate their 45th Wedding Anniversary!  Forty Five!  That's quite an accomplishment.

I made them this card, and used the new Strawberry Slush cardstock and ink to help me out.  Plus some adorable new vintage buttons!!!!

To create this look - I started with the Hello, Doily stamp, and inked it up with Versamark, then heat embossed it with White Embossing Powder.  I let it cool completely.  Then I grabbed my Crumb Cake ink pad and a sponge dauber.  Using a very light hand, and a very little amount of ink, I started in the center of the doily and began to swirl the ink outward.  If I need to add ink to the sponge dauber, I do it ever so lightly and again, start in the center and work outward, swirling the dauber the entire time.  Once, I have the entire doily sponged, I may need to wipe some ink off the embossed area - I just use a kleenex.  Next, I inked up the En Francois stamp with Strawberry Slush, stamped it off once on a piece of scratch paper, then stamped it over the top of the doily image.  Again, you'll need to wipe the ink off the embossed area - and I'd say rather quickly, as I've noticed that the White Embossing powder can absorb some ink if you let it set too long.


 I used White Embossing powder again to emboss the sentiment.  This strip of cardstock was edged with two pieces of Crumb Cake Cardstock that were punched with the Dotted Scallop Border Punch.  Once I adhered that, I glued on those super adorable buttons.


This is really a pretty easy card to create - and so elegant at the same time.  It was almost a flat card - but those buttons were a must!  I mean really, how long did you think I could go without buttons, DSP or ribbon? One outta three ain't bad - right??

post signature