Sunday, August 2, 2015

Creation Station: Heartfelt Sympathy


Welcome to the Creation Station Blog Hop!  We are here to inspire you - and this week our theme is Sympathy, Get Well, Thinking of You.....  We are concentrating on the new Heartfelt Sympathy set or the Thoughts of You set. 

I picked Heartfelt Sympathy....cuz mine hadn't seen ink yet!!!  

Before I get too far into this post, I'm going to do a little public service announcement.  When I started playing with this, I noticed my set had a couple of errors in the stamped image.  One, you'll see in a couple of cards below.  The 'y' doesn't have the loop of the y finished.  Also, one of the phrases for the inside is missing the 'f' in the word of.  However, I know that when I call Stampin' Up! they will fix it for me - cuz they rock like that.  If you notice that your set has errors, please contact your demonstrator and they will take care of it for you. Cuz we rock like that!!!

Print this card recipe and instructions

This card kinda had me baffled....I'll admit!  I'm not sure why.  But once I got it to come together, I do like it.  A little different color combo here - Mint Macaron, Lost Lagoon and Bermuda Bay.  I started off by heat embossing the sentiment in Gold, and then watercolored over the top in those colors mentioned.  I added some splatters of glitter to the card.  


Once it was good and dry, I started to layer it up.  Do you notice a sneak peek of something to come??? 


Print this card recipe and instructions

The finished card size is approximately 5-1/2"x5-1/2", so I created an envelope with the envie punch board.  I happened to use the same Designer Series Paper for the envie as the strips on the card.  

I also finished the inside of my card off - something I rarely do, but need to.  


Ready for the next card?  Again....I struggled with this one....I think I put it aside and came back to it about 20 times!  Ugh!  
Print card recipe and instructions

This time I embossed the sentiment in silver, and watercolored over the top.  I started off by brushing water over the top of the sentiment and dripped Blackberry Bliss into the water.  I loved the effect it did - almost a tie dye kind of look.  However, it wasn't quite right for the card.....so....I smeared it around.  I let that dry.  It was darker than I wanted.  So I added some water over the top and blotted it with a paper towel.  That helped - and you can see where I did this.  I'm okay with that.  

I don't know why I added the Bermuda Bay splatters....so don't ask!!!  :)  Remember - this was a struggle card!


Print card recipe and instructions

I added the banners to tie the card together.  Do you spot another sneak peek at all?  And do you see how the 'y' in the bottom line doesn't complete the loop?  At first I thought it was my stamping....but it's not.  
In the end, it's not my favorite card, but not my least favorite either....

Onto my last card of the day. 

Ironically, this is my favorite of the three and it took the least amount of time.  Go figure!


Get card recipe and instructions here

And again....this is watercolored....surprise, surprise!  I embossed the sentiment in clear embossing powder.  The watercoloring is done in Calypso Coral and Blushing Bride.  

I added some sequins - gold and clear.  Simple and sweet.


I used my scallop edge rotary cutter to trim the edges. Love! that dainty edge it creates.  This was the first time I'd used that - watch out - you'll see more of it!  I think it'll be sweet on baby cards.


Get Card Recipe and Instructions Here

To finish this card up, I popped it up on top of some Designer Series Paper.  Easy!!!  And quick.  No wonder it's my fave!

What did you think?  I'd love to hear what you'd do different or any ideas you have - just leave me a comment below.

To be further inspired, hop your way around and check out what the other talented design members have created.....


SUPPLIES USED:

Heartfelt Sympathy in Gold/Mint
Product List

Heartfelt Thanks in Blackberry Bliss
Product List


Heartfelt Thanks in Calypso Coral
Product List
post signature

Tuesday, July 28, 2015

Foxy little friend - Wilderness Awaits


Hello friends!  A little something you may not know about me - I love the outdoors!!!  Camping, critters, etc....they are right up my alley.  Let me clarify - camping in a camper is my preference, however, I've done PLENTY of tent camping in my day! 

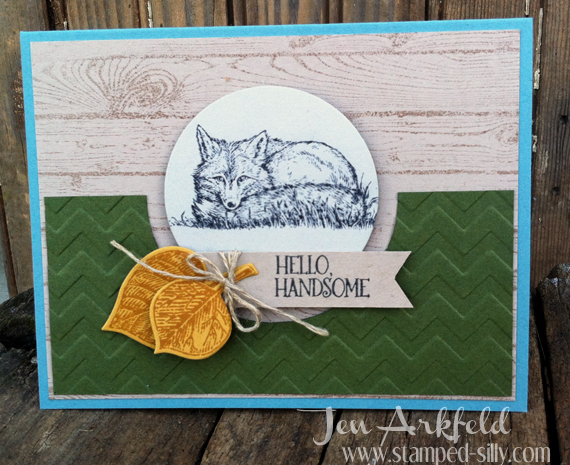
When I saw this little fox - something about him (or possibly her) struck me.  In this card - I'm calling this a "her" - and I think she's being a little seductive....I imagine her saying, "Hello, Handsome.  Come and cuddle up, Buttercup!"

This card was my Convention Swap.  We don't get many masculine cards in our swaps, so I decided to try and inspire.

Everything is layered on a Lost Lagoon base, with Crumb Cake (stamped the Woodgrain in Crumb Cake ink) as my largest panel.  Then I cut my Mossy Meadow piece with some circle thinlits, and also cut out the foxy circle (Sahara Sand) with the next size smaller thinlit.  I then ran the Mossy Meadow piece thru the Big Shot with the Chevron Embossing Folder.

I added a couple leaves from Vintage Leaves, I had stamped them onto Delightful Dijon with the same color ink.  Tied them onto my tag/flag with some Linen Thread.


In the end, I think it makes a swell masculine card!

Hey - If you are in need of a catalog - I have plenty and would love to send one to you - just leave me a message and I'll put one in the mail to you.  Please keep in mind - if you currently have a Stampin' Up! Debo, pleaese contact your demo for a catalog!

post signature

Monday, July 20, 2015

Blogging Hiatus OVER!!!

Well.....let's HOPE my blogging break is over.  I've missed blogging.  I've missed creating.  I've missed my routine.  

We have had a busy spring and summer, and I'm really beginning to feel that I miss the school year routine.  It's when I have something that's normal - an actual schedule.  But, I've got another month and a week to go before school starts.   So if I don't post one a real regular basis - don't shoot me!  We do have a few more fun things planned with the kids - and I am discovering that as the kids get older, the more running we do.  Between basketball camps, baseball and baseball camp, football camps - we just run!  Now that a lot of those things are over, we try and enjoy camping with the kids and just being together as a family.  Which also means, I haven't had much time in my craft room at all.  The room itself is a mess, and I almost dread going in there.  It'll be a good day when I can clean things up and organize!  THEN CREATE!!!

I have had a few moments to create some things and would love to share.  So, I'll try my best to get a couple of posts up here to share what I've made.  I'll be at convention this week - so will schedule a few posts while I'm gone.

Let's start with this card:


I'm loving this new Watercolor Wings stamp set.  I think all of the detail and the color combos make it super fun.  

This card was easy - started with a card base in Cucumber Crush (one of my new fave colors btw).  I stamped the little dots in Versamark to create a background.  Then added a die cut piece from the paper stack - Pretty Petals.  I used the new Lots of Labels framelits, but only die cut the one end to create the banner shape.

Then onto the butterfly - it was stamped with Mint Macaron - first layer was stamped off.  (it doesn't look very minty in the photo above...lighting issues!)  I went over the top with Watermelon Wonder.  I topped off my butterfly with a messy nest of silver thread and one of the new Classy Designer Buttons.  (LOVE these new buttons!)

To finish off the card, I added the Cheers sentiment die cut in Watermelon and then used Crystal effects over the top to add some dimension and shine.  


This card I used for a swap at our July Inspiration Night for my team members.  

Hope you liked the card today!  


post signature

Sunday, July 19, 2015

Creation Station: Birthdays


Hey all!  It's time for a blog hop from the Creation Station team.  This week we are focusing on Birthdays - The Build a Birthday stamp set is what I chose to use.

This set is so versatile - create a cake in any color you choose.  Perfect for kids cards, masculine cards, girly cards....just change up the colors and you have an entirely new look.  

I went pretty neutral here....


The only thing I did "out of the box" was to use Crystal Effects on the cake stand and banner.  I wanted the cake stand to look shiny and was able to easily accomplish that with the Crystal Effects.  I decided to add it to the banner at the last minute.  I was going to put rhinestones on the banner, but didn't want to steer this to girls or boys.  I think this works for both this way.

I used some pinking shears to cut the ends of the sentiment portion.  I thought that added something different than the typical flag end. 


That's my creation for the week - hop around now to see what the other talented team members have to show off.....


post signature

Sunday, June 7, 2015

Creation Station: New Stuff and Father's Day!


Happy Sunday all!  We've got a great day of masculine style, guy cards to share with you today and are all creating with some fun new Stampin' Up! product!

Let's get started!

First up I have a Father's Day card to share with you:

This card features the new Bohemian DSP.  I picked a "calmer" pattern from the pack for this card.  I'll be the first to admit - this pack of paper is a little .....wild?....for my taste, but I know that I'll find some ways to use it.  Here is such an instance.  I think this pattern works great for this card.  The yellow strip is the back side, and I'm really liking how they work together.

Unfortunately....I also don't have any masculine stamp sets in my collection (that are currently available to order).  I know.  I know.  This is a shame.  I'll be correcting this situation shortly.  So.  Today I opted for the little ties from Something for Baby.  Hey.  It works - right?  For some male out there anyway.....my Prince Farming doesn't wear a tie very often.  He's more of the tractor driving, farmer cap wearing kinda guy.   Hmmmm.....there's a stamp I could use - a cap that could have different phrase put on the front.  Alright.....enough of this talk.  Back to the card.  
I added a snippet of burlap ribbon - cut the edges off and roughed it up a bit, and I think that does it.  The sentiment - it's from Crazy About You set.

Moving on...


For this card - I used the new Build-a-Birthday stamp set.  Now...this set I'm diggin'!  It's so versatile.  I opted for some colors that are more on the gender neutral side.  (Tempting Turquoise, Bermuda Bay, Cucumber Crush, Pear Pizzazz and Smoky Slate)  

With this set you could create the same card in so many variety of colors and get a different feel each time.  Think Regals, Subtles, Brights, Neutrals....they'd all give you good color combos.  


One last card for you....


Again - with Build A Birthday.  And again.....using somewhat gender neutral colors.  I'm telling you - this set is versatile!  It's a must have.  I'd love to create a bunch of different sentiments for it. I don't know why, but while I was creating this card, I kept wanting it to say....Happy Birthday Old Fart.....or You're so OLD, I couldn't fit enough candles on your card.....  That's just all coming from my Sarcastic Little Mind....!!!  :)
Alright folks - time for you to head along to the next fabulous member of the Creation Station design team....prepare to be inspired!


post signature